
Range Rover Sport and Discovery 3 Harman Kardon and Logic 7 Kits JCKFK-853-3 and JCKFK-853-6
This article describes how to replace the stereo in a Range Rover Sport or Discovery 3 using
the JCKFK-853-3 and JCKFK-853-6 Kits. Applicable for Harman Kardon or Logic 7 sound system with factory navigation / vehicle settings screen.
If you do not have the Harman Kardon or Logic 7 amplifier and no SatNav screen the process is more straightforward. Use kit JCKFK_853-1 for the basic stereo.
For the basic stereo with no SatNav screen and a Harmon Kardon amplifier use JCKFK-853-2.

To check if you have Harman Kardon or Logic 7 have a look at the front door speaker or tweeter grilles. This one shows the Harman Kardon version.
Both JCKFK-853-3 and JCKFK-853-6 will retain the use of the factory navigation and settings screen.


Before doing anything remember that you MUST disconnect the battery ground terminal prior to disconnecting any cables in the centre console underneath the gear stick.
Remove the trim around the stereo by pulling away from stereo. Please note that the trim is held on by spring clips and these are known to not come out and instead fly off behind the dash. They can be extremely tight or come off easily…


Start to remove the Range Rover stereo. It is held in by Torx T20 screws. First remove the hazard warning strip and disconnect it. Undo the 4 screws that hold the stereo. You may not be able to remove the stereo as it is likely held by the air conditioning panel. Now proceed to lift the panel around the gearstick.
The panel around the gearstick is held in by 2 screws and clips. Undo the 2 crosshead screws (left and right) where the panel seats next to the air conditioning controls. The panel can then be levered up (with trim tools) starting from the centre armrest cubby hole. Apply handbrake and / or chock wheels to prevent car rolling away. Do not work on a steep incline.


Move gearstick to “D”. Pull gearstick up sharply to remove.
Gearstick is removed.


Now start to lift the panel surrounding the gearstick. Use plastic trim tools and start at the centre console cubby hole.
Before disconnecting the cables you MUST disconnect the negative terminal on the battery (13mm bolt). If you do not do this you will get an Airbag Warning light when re-connecting the cables and will require a reset by using diagnostic tool.
Remove the gearstick trim panel.


Undo and remove the 4 Torx T20 screws holding the heater control panel in place. Take care not to drop them. Slide stereo forward and disconnect the connectors at rear. Disconnect the the Orange fibre optic cable first – do not bend these excessively. Also remove and disconnect heater panel.
After disconnecting the stereo you will be left with these connectors. The orange cable on the left is the fibre optic cable – DO NOT bend excessively. These connectors are for both the Harman Kardon and Logic 7 versions.
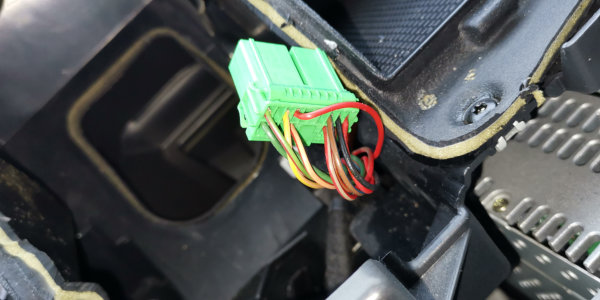

Locate the steering wheel interface supplied with the installation kit. There will be a Red lead that needs to be connected to a switched 12V supply. You can either connect it to the Red wire on Hazard Switch bank connector or to the cigarette lighter socket. Crimp or solder the connection. Do not use the “tap-on” connectors – a great source of intermittent faults.
Next task is to dis-assemble the stereo by removing the front panel and 6 cd changer from it. You will then be left with a unit to embed in the dash.
This next section details how to dis-assemble the stereo for embedding of the main unit. The main stereo unit is required so that the original SatNav screen can still operate.
You will be removing the front panel and 6CD changer – keep these safe in case you want to re-fit the original stereo in the future.


Stereo has been removed and is ready for dis-assembly.
To remove the front panel undo the 2 screws at top of panel and prise off the front by pushing locking tabs up. The front panel PCB has 2 flexible strips holding it to the main unit. To remove these you can push the locking tabs. Alternatively, remove the top plate on the stereo and disconnect from the main PCB.


Front panel flexistrips have been disconnected.
This image shows the ZIF connectors in “released” position.


Now remove the screws marked A to H. This will allow the front mounting plate to be removed.
Stereo and 6CD changer with front plate removed.


Remove stereo top cover – there are 4 screws. Undo the screws and prise the top cover off.
The main PCB now needs to be removed. This is a static sensitive part. Wear an anti-static wristband and ground appropriately.
Remove the 4 screws that hold the heat sink. There are 3 screws to remove on the main PCB and a locking tab to bend through 30 degrees. The PCB will then lift out. Place on anti-static mat.


Now that the PCB has been removed undo the 2 screws attaching the 6CD changer to the main stereo housing.
Now that the 6CD changer has been removed set it to one side.


Re-install the main PCB and secure the locking tab. Fit the 3 screws that hold the PCB down. Attach the 4 screws to the heatsink assembly.
Re-attach the top cover and fit the 4 screws. Unit is now ready for re-installation.
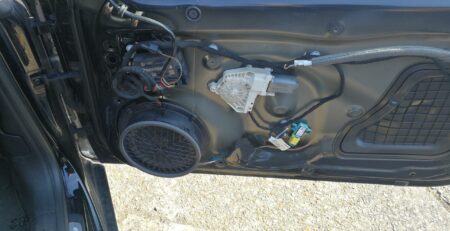
Now that the stereo has been converted into a smaller unit it is time to install in the void in below the heater panel. Foam pads are attached to the sides to stop it rattling and it can be cable tied in place.
You will be attaching the fibre optic extension lead and the power harness extension lead from the steering wheel interface. The other 2 sockets (12 way and antenna connector) remain empty.


Embed the main stereo unit in the void between the two air-vent pipes. Picture is from a Range Rover Sport – the Discovery 3 location is in driver’s kick panel. Use foam pads to stop rattles and cable tie in place.
Attach fibre optic extension cable and power cable from steering wheel harness.
Re-connect wiring harnesses to the heater control panel.
Run amplifier bypass cable to factory amplifier underneath driver’s seat (RHD). You can also using fibre optic interface kit JCK23-244 to enable the factory amp to operate with the replacement head unit.

Re-connect heater panel and all connections under gearstick panel and re-assemble. Do this BEFORE you re-connect the battery.
Re-connect car battery and test new stereo turn on and that you have sound from the front and rear door speakers.
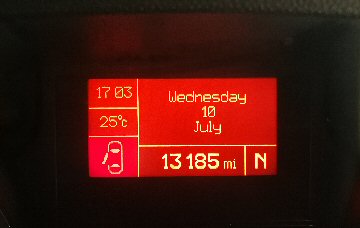
You should see the original Range Rover screen with Navigation / Vehicle 4×4 settings.
Remember to configure universal patch lead for the stereo of you choice. Disconnect power from stalk interface before plugging patch lead in.
Connect Fakra FM antenna lead ensuring that you do not force this connection. It is better to rotate it slightly when inserting to make sure that it mates correctly.
Assemble replacement stereo and add brackets to fit the universal cage.
We always recommend that for optimum sound that you should pick a Pioneer, Kenwood, Alpine, JVC or Sony head unit. These will also fit the cage and fascia correctly. Chinese units will require modification to the cage and fascia as they have (mostly) non-standard dimensions.
Comments (11)
I have a 2008 RRS SC with the Logic 7, yes I want to keep the upper screen functions as well as the steering wheel controls. I am not an electrician, so have clear easy to understand directions is imperative. Do you provide the step by step instructions with images similar to what’s online?
Also, I am in Qatar, will you ship diretly to my residence or will I need to have it shipped tot he USA first?
Thanks, looking forward to your response
Morning Jonallen,
There is quite a lot involved. Please see the following how to article:
https://www.justcarkits.co.uk/blog/2020/10/06/upgrade-stereo-range-rover-sport-and-discovery-3-with-factory-navigation/
Would need to check shipping options and price for Qatar
Hi All.
i have a 2007 sport hse, what would be the cost for this upgrade please. .supplied & fit
Kind Regards
What is the sound quality like without the amplifier? I have a 2007 RRS with the Logic 7 stereo.
Hello Gary,
As long as it’s a quality stereo it sounds fine. Anything Pioneer, Kenwood, Sony, Alpine, JVC will give decent sound quality.
The Chinese stereos are nowhere near the same and sound muffled and “wooden” by comparison – avoid.
If you have the factory sub in the bootlid this will not work, though you could add a small amp to drive it or also add a small underseat sub.
Hi’ is this kit to fitt on range rover sport2005
Hello,
Yes, this will allow you to replace the stereo on a Range Rover Sport.
Need to know if has:
Basic stereo
Harman Kardon with Navigation
Logic 7 with Navigation
Basic stereo with Navigation
Once we know the configuration can let you know which kit you need
Hi,
Would this kit work on a 2012? These don’t have the numeric keyboard but the cd slot and analog clock trim above.
Sorry, mot compatible with a 2012 model.
Please let me know if retain the settings function of on original on board computer , because it needs the change with the wheel button .
Hello Juan,
Yes, you can retain the original Settings screen.
From the installation instructions:
-check that the settings screen on the instrument cluster can be accessed. This can only be accessed while the new head unit is off. Note; updating the time can only be done with the original head unit, to reset the clock disconnect the battery at midday to set the time to 12:00.
-check that the small display screen on the instrument cluster can be operated from the steering wheel controls. The new head unit needs to be turned off so that the steering controls can control this display.
Regards,
philip